Intro
This guide walks new users through unpacking, setup, connection, mapping, and the first mowing task. Follow the sections in order.
Before You Start
Your first-use checklist
Prepare |
Check |
TerraMow Robot, Base Station, power adapter, screws, and tools |
All items are included and undamaged. |
A suitable Base Station location |
Flat, stable, and within reliable home Wi-Fi coverage. |
A phone with the TerraMow App |
Bluetooth and Wi-Fi are enabled; you know the home Wi-Fi password. |
A prepared lawn |
Remove loose objects, branches, wires, toys, and other obstacles. |
Important Safety Note
Keep children, pets, and bystanders away from the mowing area. Before lifting, turning over, cleaning, or servicing the robot, turn off the Main Switch. Wear gloves when handling cutting blades.
Safety First
- Do not use a high-pressure hose on the robot, wheel axles, TerraVision panel, or Base Station.
- Do not start a mowing task until the lawn is clear of objects that could be struck or tangled.
- Use only the supplied or approved charging equipment and replacement parts.
Part 1 Unbox and Check
Unpack the robot and accessories on a clean, level surface. Keep the packaging until you have confirmed that the robot powers on, charges and connects successfully.
Check the contents
- TerraMow Robot
- Base Station
- Garage Kit
- Accessory Box
- User Manual
- Quick Guide
Unboxing Video
V Series: Unboxing TerraMow V1000
If something is missing or damaged
Do not install or operate damaged equipment. Record the issue with photos and contact the TerraMow Support Team via support@terramow.com before proceeding.
Part 2 Install the Base Station
The Base Station is the robot's charging and starting point. A poor location can affect docking, mapping, and connectivity, so choose the site before securing it to the ground.
Choose the location
- Place the Base Station on flat ground with no slope.
- Ensure that the TerraMow robot can enter and exit the Base Station smoothly.
- Make sure a strong home Wi-Fi.
Install and check
Preparation Before Installation
- Base Station
- Garage Kit
- Tools: Garage Screws, Hex Key, Base Station Screws, Hammer (optional)
Key Steps of Base Station Installation
-
Garage Kit InstallationPlace the Garage Kit on top of the Base Station. Align it properly and tighten all garage screws.
-
Secure the Base Station to the GroundSecure the Base Station with the Base Station screws at the perfect spot you’ve found. Use the Hex Key and a hammer if needed.
- Adapter Connection
- Ensure that the Adapter is connected correctly.
- Connect to the power
Post-Installation Check
Confirm that the Base Station indicator light turns green.
Base Station Installation Video
IF IT FAILS
If the light is not green, recheck the adapter connection and power supply. If the robot cannot enter or leave the base station smoothly, reposition the Base Station before mapping.
Set Up the Base Station Off the Lawn
- Ensure that a strong network signal is available.
-
If the Base Station is located within 5 meters (16.4 ft) of the lawn in a straight line:Ensure that the Base Station is oriented towards the lawn. In this case, if the direct distance between the Base Station and the lawn is within 5 meters (16.4 ft), TerraMow robot will automatically recognize the lawn and start mowing without manual assistance.
-
In other casesA customized pathway up to 60 meters (196 ft) to the lawn is required.
Tip: If the placement of the Base Station cannot face the lawn, even if the distance is within five meters, a customized pathway needs to be set up.
Video Guide of Setting Up the Base Station Off the Lawn
Part 3 Download the App and Connect
Download the TerraMow APP
The TerraMow App is used to add the robot, manage the maps, start tasks, change settings, and contact support.
TerraMow App is available for both the iOS version and Android version. Download now using the link here.
Create Your TerraMow APP Account
Follow the steps below to register your account and personalize your lawn care settings.
Key Steps of Creating Your Account
- Select Your Country or Region
Tip: Accounts can only be shared within the same country or region.
-
Review the Terms and Privacy PolicyRead and accept the Terms of Service and Privacy Policy before using the app. Click here to learn more.
-
Select "Log in or Sign up"On the welcome screen, tap "Log in or Sign up" then tap the "Sign up" icon at the bottom of the page. Fill in your "Account name" (email address), and create a "Password". For better security, using a mix of uppercase and lowercase letters, numbers, and symbols.
-
Verify Your EmailEenter the verification code sent to your mail inbox. If there is no related email, please check your spam folder.
-
Complete SetupWhen you see the welcome screen, tap Get started to continue.
Switch App Language
Follow the below steps and choose your preferred language.
Supported languages: EN, CN, DE, FR, ES, HU, DA, SV, IT, PL, NL, CZ, SK, HR, LT, NN, FI, SI.
Connect the TerraMow Robot
Before you begin, turn on the robot's Main Switch. Turn on Bluetooth and Wi-Fi on your phone, then stay near the robot.
-
Enter Setup PagePress and hold the "Power" and "Home" buttons at the same time until the lights start flashing to access the Wi-Fi setup mode.
Tip: Keep your phone and robot close to the router during setup.
Method 1: Nearby Device
-
Select the Robot in the "Nearby devices" sectionTap "Add the device" and choose your robot shown on the "Nearby devices" section.
-
Enter Wi-Fi Name & PasswordInput your Wi-Fi name and password, then wait for the connection to complete.
Method 2: Add by Model
Use this method if your robot does not appear in the "Nearby devices" section.
-
Select the Corresponding ModelTap "add the device" and choose the corresponding model.
-
Select Your RobotChoose the robot you want to connect.
-
Enter Wi-Fi Name & PasswordInput your Wi-Fi name and password to finalize the connection.
IF IT FAILS
Restart the robot, check the Wi-Fi password, and try again. You can also watch the TerraMow app connection tutorial here for step-by-step guidance.
Switch Robot Voice Language
Follow the steps below and choose your preferred voice language.
Supported languages: EN, CN, DE, FR, ES, HU, DA, SV, IT, PL, NL, CZ, SK, HR, LT, NN, FI.
Part 4 Create Your First Map
Prepare Your Lawn
The TerraMow robot is designed for regular lawn maintenance. Before using it, please prepare your lawn to ensure efficient and safe operation.
- Remove branches, stones, toys, hoses, wires, and loose garden items.
- Check that the lawn edge and route from the Base Station are clear.
- Identify places the robot should never enter, such as ponds, steep edges, flower beds, or a lawn that joins a neighbor's property without a clear boundary.
- For lawns divided by a path or other separation, plan to add another zone or a pathway after the first map is created.
Auto Mapping
For first-time use, start with Mapping mode. TerraMow robot automatically creates the lawn map while working, and you can refine it later.
Start Mapping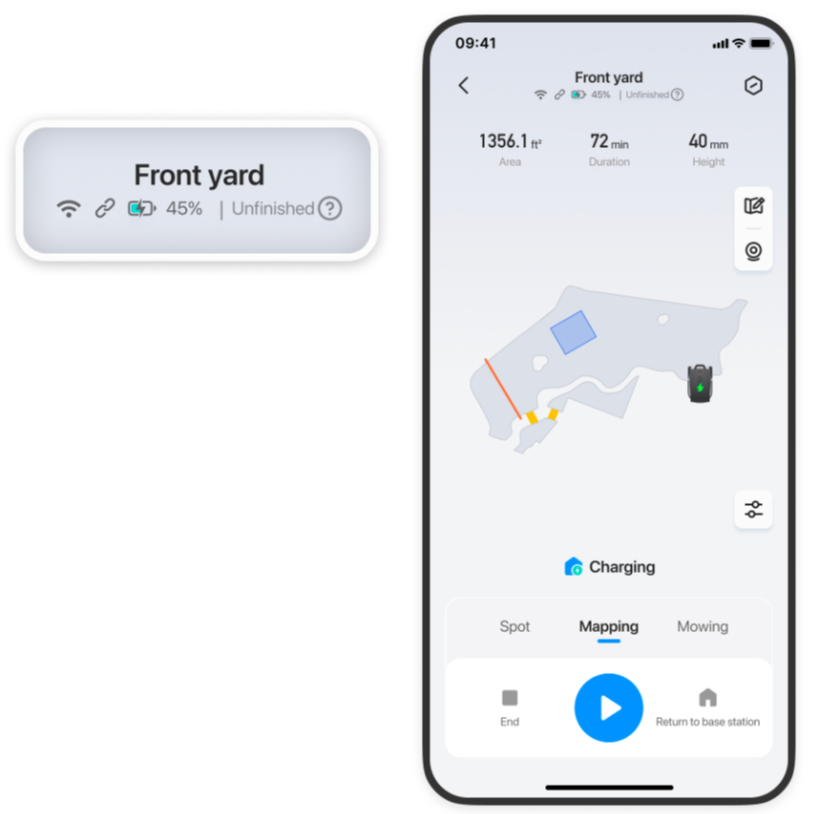
Three Modes Available Before Creating the First Map.
-
SpotUse Spot mode for small lawns. The robot can start working directly without a Base Station or a pre-built map. The maximum area for a spot map is around 120 m².
-
MappingUse Mapping mode to create a lawn map and add Grass-cutting Zones, No-go Zones, and other preferences.
-
MowingUse Mowing mode to let the robot map while mowing, based on your preset mowing settings, such as cutting height and mowing speed.
Start Mapping in One Click
- Select 'Mapping' icon.
- Click 'Start'.
Refine the map only when needed
Feature |
Use it when |
No-go Zone |
The robot must not enter an area, such as water, flower beds, unsafe edges, or an unbounded neighboring lawn. |
Grass-cutting Zone |
A low, passable surface, such as a stone path, or bare ground, should be included as part of the mowing area. |
Add a New Zone / Pathway |
The lawn has separate sections that need to be connected. |
Tip:Create the simplest accurate first map. Add extra zones and pathways after the main lawn works correctly.
Part 5 Complete the First Mowing Task
Five Mowing Modes After Mapping
After the first map is created, choose a mowing mode based on your requirement.
-
Spot: Instant mowing without base station or mapping.Suitable for a tempory mowing for small areas such as a separate little patch.
-
Auto: Mow the whole mapped area and can update the map automatically.Suitable for users who require comprehensive maintenance of the entire mapping area or want to update the map.
-
Zone: Mow specific zones by sequenceSuitable for lawns with different areas that need separate schedules or settings.
-
MowBox: Quick mowing within a selected mapped areaSuitable for quick trimming of a specific section in your lawn without mowing the entire area.
-
Edge: Edge-cutting the whole mapped areaSuitable for situations requiring precise edge trimming to maintain clear boundaries between lawns and flower beds, paths, and driveways.
Mowing Settings
Use General Mode for standard mowing settings, or Customized Mode when you want to adjust mowing settings for specific zones.
Key Steps of Using General Mode and Customized Mode
Tap the icon on the right side of the main page to the "Mowing Settings" page. Select between "General Mode" and "Customized Mode" based on your needs.
In both modes, you can customize detailed settings, including "Cutting Height", "Edge-cutting Distance", "Mowing Path Spacing", "Moving Speed", "Blade Disc Rotation Speed", and "Moving Direction".
General Mode
The robot maintains your lawn using the same settings. It is ideal for achieving a uniform, well-groomed appearance of your lawn effortlessly.
Customized Mode
You can fine-tune mowing settings for each zone on the map. Tap each zone to tailor its settings as you demand. It is ideal for giving special care to different areas of your lawn.
Part 6 Set a Schedule After the First Successful Mow
The scheduling allows to set operating time and frequency according to your individual needs. The schedule setting can switch between "Week-base Schedule" and "Frequency-base Schedule".
Week-base Schedule
You can choose specific days and times each week to schedule your mowing tasks.
Frequency-base Schedule
You can set a fixed frequency to automatically mow the lawn based on the specified time intervals.
Key Steps of Setting Schedule
- Click the setting icon and select "Schedule".
- Setting schedule (date, time and mowing type) as your demands.
- You can flexibly arrange your mowing schedules and enjoy a convenient lawn management experience.
Part 7 Updates and Routine Care
Software Updates
Over-the-Air (OTA) updates improve software features and performance. You may update immediately or choose a later time.
Before an update:
- Keep the robot battery above 50%.
- Use a stable Wi-Fi connection and leave the Main Switch on.
- Do not interrupt the robot or power supply during an update.
For a step-by-step tutorial guide, click here to learn more.
Keep the Robot in Good Condition
Task |
What to do |
YouTube Link |
Blades |
Check regularly. Replace as needed, typically every 240 operating hours depending on use. Always fit new screws with replacement blades. |
|
Robot cleaning |
Turn off the Main Switch. Use a soft brush, soft cloth, and low-pressure water hose. Keep the TerraVision panel and rain sensor dry. |
|
Base Station cleaning |
Turn off power. Use a soft brush and cloth to clean the garage, plate, markers, and charging pins. |
Part 8 User Manual and Quick Guide
TerraMow official website offers multiple language versions for the User Manual and Quick Guide of TerraMow V & S Series to cater to a diverse audience. Click here to get the latest version.
Supported Language Version
V Series: EN, DE, FR, ES, PL, IT, SE, NO, DK, FI, CZ, SK, HR, SI
S Series: EN, DE, PL, CZ, SK
Stay informed about the latest user manual and quick guide. Our digital content is updated periodically, ensuring that it becomes richer and more valuable over time.
Part 9 After-Sales Service
For the fastest help, contact support@terramow.com or submit feedback in the TerraMow App. Support will review your case and confirm whether remote troubleshooting, parts replacement, or service-center handling is needed.
TerraMow currently has official service centers in Europe (Germany, Poland, Czech Republic, Spain, and Lithuania), the United States, and the United Kingdom.